Showing posts with label Honey Bee. Show all posts
Tuesday, May 19, 2026
Christmas Cardinal
I always loved seeing cardinals when we visited family in Indianapolis. One of my grandmothers always sent Christmas cards with cardinals. Now I can, too! After last Christmas I got the Waffle Flower Cardinal Duo Die-n-Stencil. Here's my first card.I used PTI Pure Poppy and Smokey Shadow through the stencil which was very easy to line up. I used a white gel pen to highlight the details. Poppystamps Shasta Twigs were colored with PTI Pinefeather. The embossed background was made with Honey Bee Snowy Pines folder which I sprayed with Lindy's Pixie Dust for a beautiful gold shimmer.Birch Press Design Merry Christmas Vintage Sentiment was leftover from last year and was just right with the beautiful gold glitter letters. Can't wait to make some more cardinal cards. I'm entering Christmas Kickstart, DCD and SSS Wednesday.
Thursday, July 17, 2025
More Christmas in July
Emboss resist was one of the first techniques I learned and I still love it. I started by white embossing and diecutting the fun circles tree from SSS Color Me Trees.
Then I ink blended them with Distress Oxide Pine Needle and Peacock Feathers. The ink wipes right off the white embossing. I colored the center circles with Pentel silver Sparkle Pop pen which gives gorgeous sparkle you can see in my IG post video. The embossed panel was made with SSS Dibble Tile folder and I attached it to a metallic silver mat. Versafine Clair Morning Mist was used to stamp the sentiment from an old Honey Bee set. I raised the center tree and the sentiment strip, but should still just need one stamp. I'm entering Christmas Kickstart Challenge 100 and sending my congratulations to Jo!
Next is my card for the Poppystamps July Challenge: Red White & Bloom. I began with a red cardstock panel that I covered in Distress Spritz fired brick. The sparkle is just gorgeous! I die cut Poppystamps Poinsettia Background from the red panel and a white one. I attached the white outline to a panel of GKD Whisper cardstock. The white petals were glued in place and then the red ones were glued on top for a bit of dimension. The white leaves were brushed with white metallic watercolor before being glued in place. Poppystamps Merry Christmas Poe Script was brushed with the same watercolor and glued over the vellum strip. Check out my IG video to see the beautiful sparkle and shimmer.
Thanks so much for taking time to stop by. If your blog address is in your profile or comment, I will visit you.Monday, June 2, 2025
Christmas and Friendship
Hurrah--Indiana Pacers are in the NBA finals! My folks were both born in Indy and so was I. My dad played college and semi-pro basketball when he was young and was a radio sportscaster most of his life. I grew up loving sports and going to lots of games. Basketball was always my favorite and that's probably in my blood as Hoosiers are absolutely crazy about basketball! So fun to have something positive to think about right now.
Time Out: Your Favorite Winged Thing challenge inspired me to make my first card using PTI's Angelic Sentiments Die. I do love angel ornaments and have a few in my collection. I die cut 3 angels so it's like a chipboard element. I painted her with white metallic watercolor, using a swirling motion on the wings. You can see the shimmer in my IG post. Picking the background took awhile as I held the angel over multiple cardstocks and specialty papers. I kept coming back to the CN9 pack of red and green foil paper which I've barely used. Love the green which can look blue depending on the light and angle. The die is my very old Spellbinders Labels 18. You may know dry embossing is one of my favorite elements for cards and this old Cuttlebug folder gave just the elegant look I wanted without distracting from the focal point. Found the perfect sentiment in Honey Bee's Rejoice stamp set. Not sure why the strip looks gray as it's actually the same white cardstock. I'm also entering SSS Wednesday.
Edited to add: I'm also entering NBUS 75th Challenge with my first card using the PTI angel.
It's time for the reveal of cards exchanged in May by those of us participating in The CCC. I used the colors and friendship theme.
I'm still loving layering stencils, including SSS Layered Flowers. The inks are Memento Sweet Plum, Lilac Posies and Desert Sand plus Delicata Golden Glitz. I've been wanting to use the Scrapbook.com Hi Cover Plate and love the fun look. I inked it and the Birch Press Simple Butterfly Contour Layers with the same inks. I did add Stardust Stickles to the flower centers after I took the picture.
Thanks so much for taking time to stop by. If your blog address is in your profile or comment, I will visit you.
Monday, August 26, 2024
Surprise, surprise--Cards with Pink!
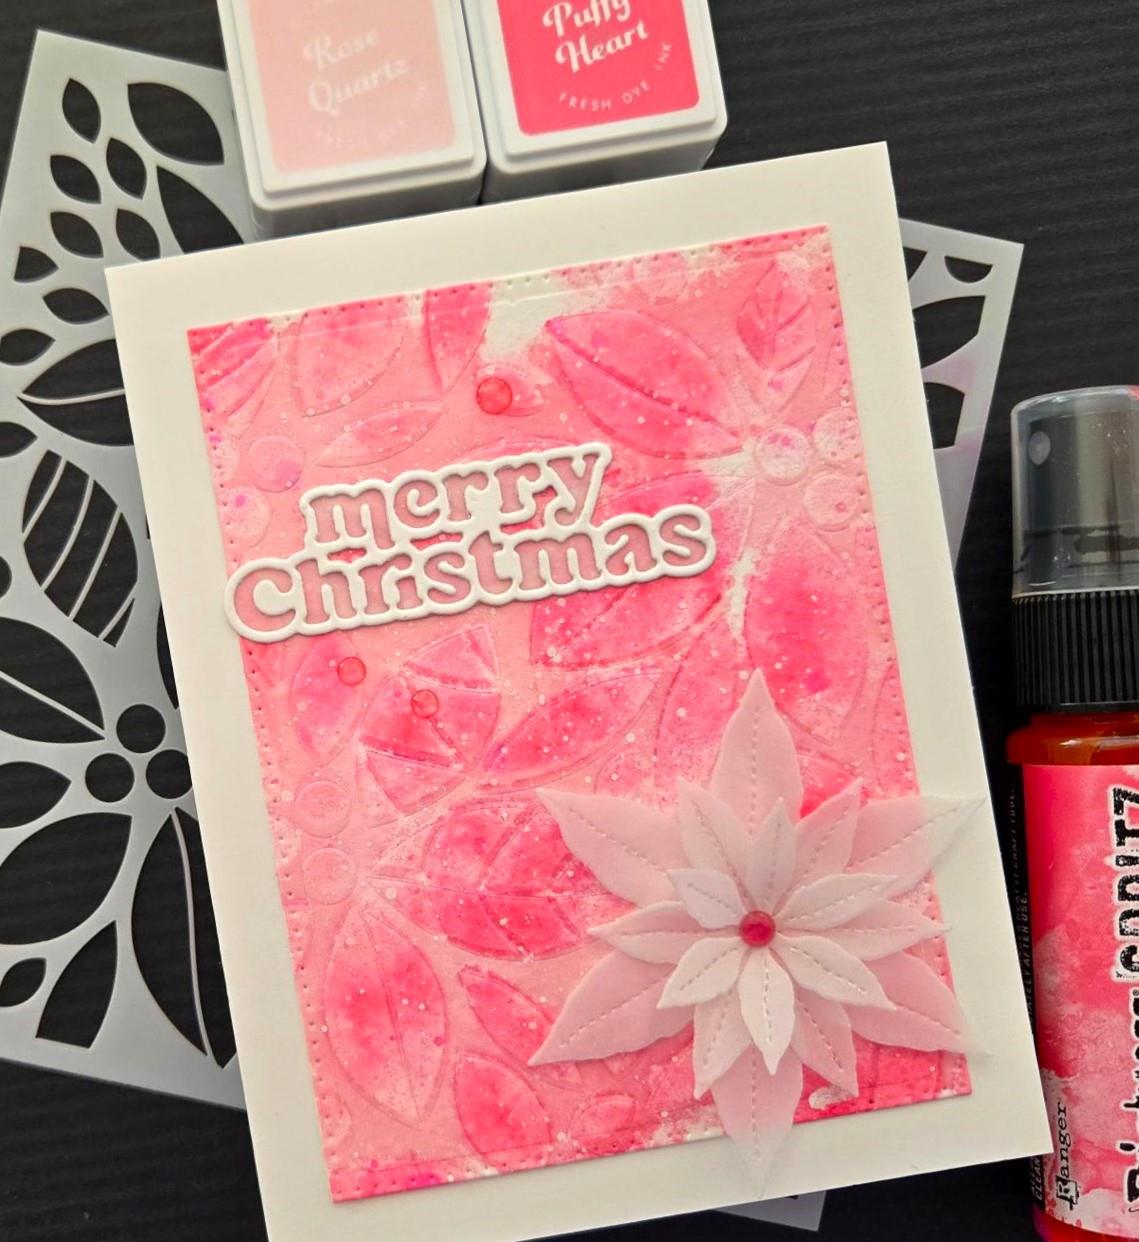
Most of you know, I love pink. So you're probably not surprised that I have 2 cards using pink to show you. First is my entry for JUGS Stencil Challenge. Layering stencils have my heart right now, along with ones to use for coloring images. However, I've been wanting to use my retired Honey Bee Poinsettia Background stencil and thought it'd be perfect for the technique I learned in Jenny Colacicco's 2022 On-line Card Classes video. Altenew Rose Quartz and Puffy Heart were pressed through the stencil onto a watercolor panel which was then spritzed with water. You can always add more ink after it dries, if you don't have the look you want. Distress Spritz in pink raspberry was sprayed through the stencil for a beautiful shimmery finish! You can see that and the white splatters in my IG post video.
Love CN9 poinsettia die cut from vellum and Birch Press Merry Christmas Vintage Sentiment is definitely a favorite! This time I used vellum for the background layer and white cardstock for the outline, without adding back in the letters. So many looks from one die set! I also can't get enough of Hero Arts Transluscent Enamel Dots and I'd love to have every color!
Next is my second card for the Altenew August Inspiration Challenge. My first entry used the colors from the graphic and this one is more the colors in the photo. I recently got the Delicate Botanicals Ensemble and already used Sweet Bouquet stamp, die and stencils. Really wanted to make a card using the other products including Botanical Wreath Builder stamp and die set along with Delicate Wreath 3D embossing folder. I only used a few of the images, so lots more cards to come. The inks are Altenew Baby Pink and Fuchsia, CN9 Parsley and Evergreen. I inked the edges of the debossed panel with white and green. Then I arranged my blooms and leaves to fit along the left side. Decided to use a Copic to color some clear gems as close as I could to the peachy color in the left, bottom corner of the photo. The sentiment is from Sweet Bouquet. I'm also entering WAW.
Thanks so much for taking time to stop by. If your blog address is in your profile or comment, I will visit you.
Wednesday, May 10, 2023
Guest Designer at Time Out Challenges
I'm so thrilled to be the Guest Designer for Time Out Challenge 238. This time it's an Inspired By Words Challenge and the sponsor is Varada Sharma Digital Designs. The quote is: "Dare to love yourself as if you were a rainbow with gold at both ends." ~ Aberjhani You can be inspired by the whole quote or any of the words. Hopefully you can tell that I used the words rainbow & gold.
The adorable Taylored Expressions umbrella die was a freebie in my last order. I die cut it from white scraps & then sponged with Distress Oxides candied apple, spiced marmalade, fossilized amber, lucky clover, faded jeans & wilted violet. Each one was backed with a white diecut circle covered with shimmer. My golden sunrays were made using light molding paste over the Honey Bee Radiant Circle stencil. I quickly added gold embossing powder & heated it with my heat tool. Beautifully gleaming texture in person!
The Impress Cards and Crafts sentiment was stamped in Versafine Clair Nocturne before I attached the umbrella circles with thin foam tape. I matted the panel with black cardstock & added a tiny pearl to the top of each umbrella. We're known in the Pacific Northwest for lots of days with both rain & sun, so we often see rainbows. That's what I had in mind when I created this card. Hope you like it & will play along in the challenge.
I'm entering SSS Wednesday.
Thanks so much for taking time to stop by. If your blog address is in your profile or comment, I will visit you.
Wednesday, April 5, 2023
Three More Easter Cards
I really enjoyed making Easter cards this year. Here's my entry for TTTC 202 using the diagonal line of Gold, Free, Easter from the board created by my good friend, Betty.
Some time ago I made several HoneyBee Stamps Lovely Layers Tulips buds from yellow & green scraps. Couldn't get my idea to work, so they've just been on my table. Luckily, there was enough cardstock to also die cut the closed tulip. That gave me a little bouquet which resulted in this card. I splattered gold watercolor over the tulips & the white panel embossed with SSS Refracted folder.
Poppystamps Happy Easter Curve was stacked several high with the top layer cut from gold metallic cardstock. I finished off with the beautiful Lucy's Cards gold & clear sequins from my favorite Champagne mix.
Next is a beautiful card, thanks to Stamplorations card fronts. I thought this one would be great for an Easter card.
All I did was splatter gold watercolor, attach the IO gold metallic diecut sentiment, add gold sequins & attach the panel to a burgundy mat.I was running out of time to get cards in the mail, so having the card front was a wonderful option. In case you haven't heard, Shery Russ, the owner of Stamplorations, recently had a PET scan that showed no signs of her stage 4 breast cancer. Lots of joy for that family this Easter.
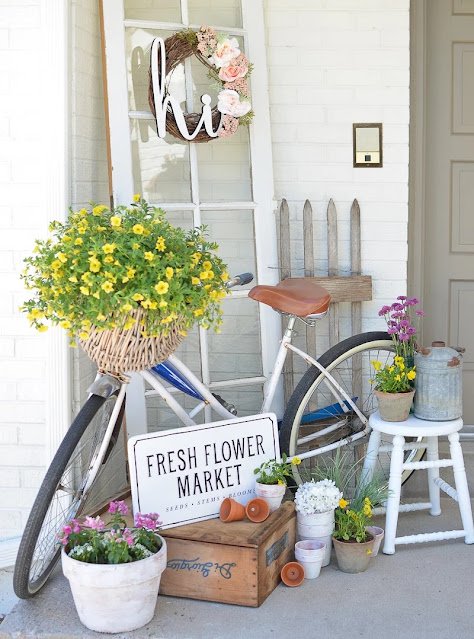
My final card was inspired by the photo inspiration for Time Out Challenge 235. As many of you probably know, I love wreaths & the color pink. So no surprise I was immediately drawn to the gorgeous grapevine wreath with pink flowers. I actually have a couple wreath dies that would have worked, but my first thought was PTI Rustic Wreath. It was die cut 3 times from a dark brown scrap & I glued them not lined up in order to make a little fuller wreath. I knew several of my Spellbinders Small Die of the Month kits had blossoms & branches. These 3 had just what I needed: March & July 2020 and December 2021. I pulled out a bunch of my beautiful pink scraps & a sort of mossy green one for the branches. Only got a shot of the pink scraps--still lots to be used.
Love the white bricks in the photo & I remembered my old Magenta stencil which I used with Golden Light Molding Paste. I've had that jar for years & it's still just as good as the day I opened it. Really love the texture it gives. This card is completely opposite of the last one--took me forever!
I'm not good at fiddling with little die cut pieces, but finally got everything attached where I wanted them. The Poppystamps Serene Rabbit diecut is the last one from a scrap I embossed with Stampendous Sparkle & Puff ep. I substituted him for the white "Hi" in the photo. The sentiment from my old TPC Studio set was stamped in Versafine Clair Pinecone on a white scrap. I added tiny clear gems to the big flowers, used a black Glaze pen for the rabbit's eye & added a piece of white crochet thread around his neck. The crochet thread was a scrap, too!
If you want to see the sparkle, there's a short video in my IG feed. Too late for this year, so I'll put this card on display for now & mail it next year. I'm also entering The Snippets Playground & SSS Monday.
Friday, November 18, 2022
Catching Up
As usual, I'm way behind posting cards on my blog. Here are a few starting with my entry for PTI Melissa's Fab Friday. It's always fun to use Melissa's inspiration for a card in my style. For my pink, green & gold I used PTI Pale Peony, Simply Chartreuse, Ripe Avocado, Prairie Grass & Delicata Golden Glitz.
I stamped with Pale Peony multiple times to get the dark petals & love the result. The images are PTI Joyful Florals, the border is Border Bling: Skinny Diagonals Frame & the sentiment is from Splits: 'Tis the Season. Hard to see, but I also added Frosted Lace Stickles to the flower centers & berries. The PTI dotted paper is from a friend. I absolutely love Lucy's Clear Iridescent jewels mix which adds beautiful subtle sparkle that is especially great with pink projects. I tend to put my focal point in a corner or off center, so it was fun to copy Melissa's design of a center focal point. I'm also entering Die Cut Divas.
Next is my entry for Stay Crafty with Hero. I stamped the envelope inspired by a JUGs challenge I didn't enter.
I've always liked this design & recently this card on IG inspired me to make a similar card. I used an old PB stamp set in my stash called Delicate Silhouettes along with dots from PRS Fall Colors & a 2003 wood mounted Hero Arts sentiment. The inks are Altenew Fresh Leaf & Hydrangea along with Versafine Clair Morning Mist. Took me forever to actually draw the dark gray lines with a Staedtler Triplus Fineliner pen as I was afraid of ruining the card. But then I realized I could always add a cardstock strip over the goof, but I didn't have to!
Hard to see the white sequins which I chose because they don't compete with the stamped images. This one went to a special blog friend.
Here's a Christmas card for Color Hues, SSS Flickr November & Snippets Playground. I planned to make a wreath with SSS Etched Laurel Leaves die, but I really liked just layering them for a center piece. The branches were die cut from a scrap of white cardstock I smooshed with 4 different green Distress Oxide inks & splattered with Brushed Pewter Distress Stain. Adding the SSS Village building was inspired by this card on IG. I embossed a white scrap with WOW White Twinkle powder & then die cut the building.
I backed the windows with a gray scrap which I also used for the HoneyBee black embossed sentiment strip which I matted with another white scrap embossed in the same powder. I embossed a panel of beautiful red cardstock with my favorite SSS 3D embossing folder called Refracted. Just couldn't get the red quite right in the pictures, but it's a great Christmas red--no orange at all. Tried a bunch of embellishments & settled on clear sparkling sequins.
Subscribe to:
Posts (Atom)